Caso real 7: falla NEXT en DTX CableAnalyzer debido a un conector no compatible con el componente
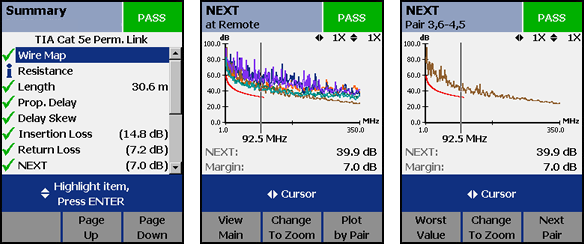
After the AUTOTEST, the installer was presented with the following DTX CableAnalyzer test result.
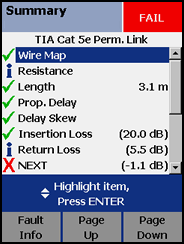
Paso 1
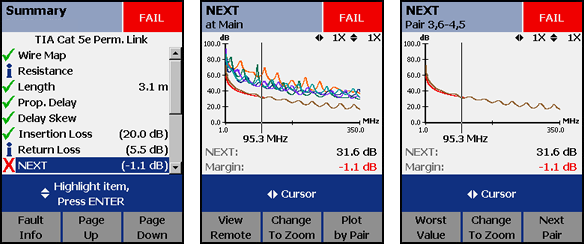
Find out which pair combination of NEXT is causing the marginal pass.
- Highlight NEXT.
- Press the ENTER key.
- Press the F3 to display the worst pair.
Paso 2
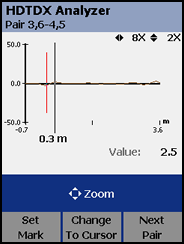
Look at the HDTDX Analyzer trace for this marginal pair.
- Press the EXIT key twice to return to the main screen.
- Highlight HDTDX Analyzer.
- Press the ENTER key.
- Press the F3 until you get to the marginal pair, in this case: Pair 3,6-4,5.
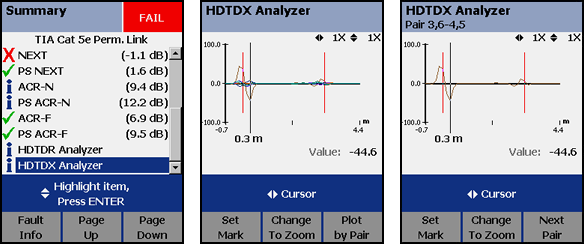
Paso 3
Analyzer the trace. What you are seeing is where the crosstalk is happening in the link. The cursor automatically goes to the largest source of crosstalk. In this case, the largest source of crosstalk occurred at 0,3 m. The two red lines represent the ends of the test leads of the DTX CableAnalyzer. So you can assume the red lines are the location of your first and last connection. Since the cursor at 0,3 m is on top of the first red line, it suggests an issue with the near end connector. You can zoom in on this event to get a better picture:
- Press the F2 key.
- Press the right cursor key.
- Press the up cursor key.
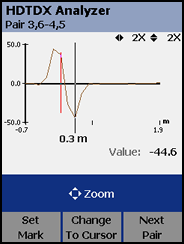
This is what you would expect to see a mated connection to look like on the HDTDX Analyzer, but hopefully not as large as this. You will note there is "Value: -44,2" on the screen as well. This is the value of the peek at the place of the cursor. In an ideal world, the value should not exceed 17,5 for any given selected test standard/limit. Clearly that has been exceeded. Looks like the far end connection needs to be reterminated. The installer reterminated this link, but it still failed. The photo below shows the termination at the near end (patch panel).

Good termination technique
This looks like a good termination. The twists are maintained right up to where the wires are punched down on the block and there is minimal jacket removal. Could this be a non component compliant Category 5e patch panel? The patch panel was swapped out with a different brand of patch panel and the link retested. The results with the new patch panel are shown below:
A significant improvement. The NEXT has improved from -1,1 dB to 7,0 dB. (A change of 6,0 dB represents a halving of NEXT). Let's compare the HDTDX trace from the original patch panel with the replacement patch panel:
|
|
| |
|
Original patch panel |
|
Replacement patch panel |
Conclusión:
It was the patch panel causing the NEXT to fail and not the workmanship of the installer. Just because it has Category 5e, 6 or 6A written on it, does not guarantee it is Category 5e, 6 or 6A. Most installers work with three different cabling vendors that they know and can trust. In this case, the installer was forced by the consultant to install a brand of patch panel he was not familiar with. Always ask this installer about their preferred choice of cabling vendor and why. And remember, not all components are equal.


