SC to SC duplex fiber loss testing with OptiFiber and DTX-xFM2 adapters
This article will guide you through the setup process for making an optical loss measurement on an SC to SC duplex link using the OptiFiber Modules OFTM-5612B/OFTM-5732 along with a DTX-xFM2 adapter.
To make this measurement, you will need two sets of hybrid PRECISION HIGH QUALITY PATCH CORDS, mandrels when using the DTX-MFM2, cleaning supplies and a fiber end face inspection device.
To make this measurement, you will need two sets of hybrid PRECISION HIGH QUALITY PATCH CORDS, mandrels when using the DTX-MFM2, cleaning supplies and a fiber end face inspection device.
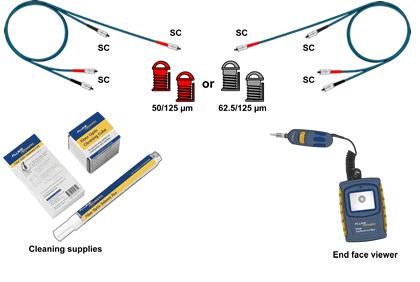
Before you start, clean AND INSPECT all end faces of your test reference cords using a fiberscope. Failure to do so will result in erratic readings. You should inspect and clean the test reference cords every 24 to 48 tests and reset the reference if needed. ¿Por qué? You can pick up debris from the connectors you are testing. You can easily become a victim of cross contamination where you damage the connectors you are testing and your test reference cords. Of note, the test reference cords shipping with the DTX-xFM2 are of precision quality with hardened end faces - specifically made for multiple insertions.
- Press the SETUP key and go to the Loss/Length tab:
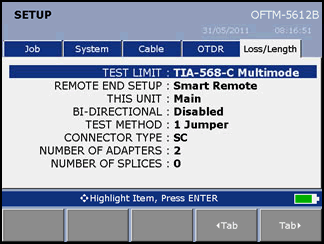
- Select the standard you wish to test against, in this example TIA-568-C Multimode. Make sure the TEST METHOD is set to 1 Jumper and the Connector Type to SC. This will ensure the help screens provide the correct information if needed.
- The NUMBER OF ADAPTERS is the number of mated connections added after you set the reference per fiber strand. Using this 1 Jumper Method, a fiber link consisting of a patch panel connected to a patch panel would have an adapter count of 2.
- If you have verified the quality of your test reference cords, you can begin setting a reference.
- IMPORTANTE: Always replace the caps on the fiber connectors whenever they are not inserted into the OptiFiber or DTX Smart Remote. This will prevent dust/dirt adhering to the end faces resulting in sporadic/negative loss readings
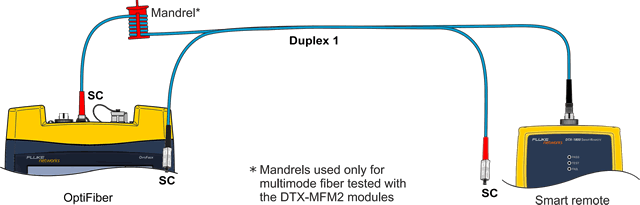
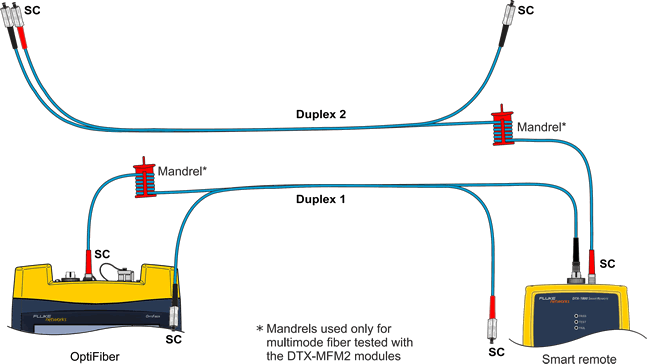
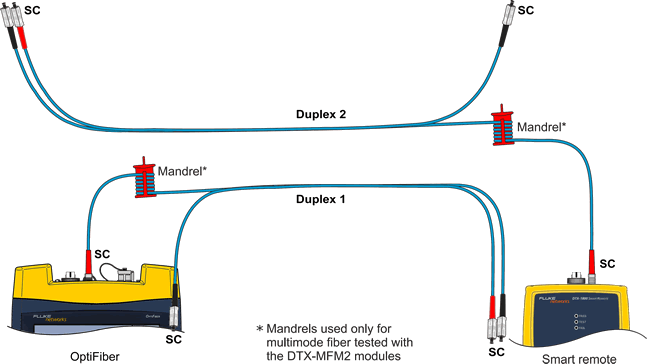
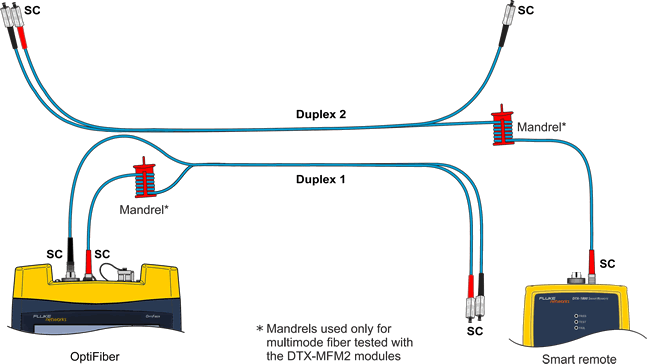
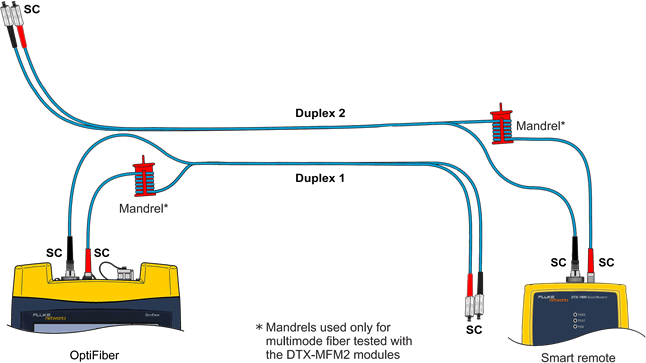
- Connect Duplex 1 as shown below: (Insert SC into the OptiFiber OUTPUT port and never remove it)
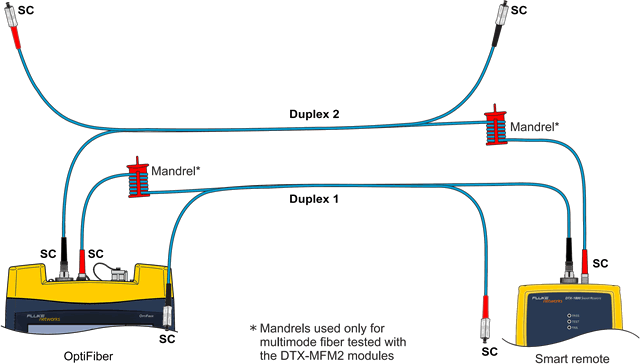
- Connect Duplex 2 as shown below: (Insert SC into the DTX Smart Remote OUTPUT port and never remove it)
- Press the FUNCTIONS key on the OptiFiber and highlight Set Loss/Length Reference.
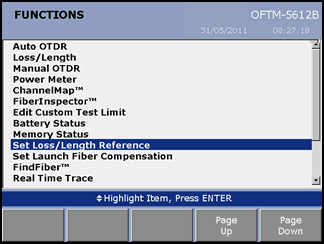
- Press the ENTER key:

- Press the TEST key to set the reference, when complete you should see something similar to this:
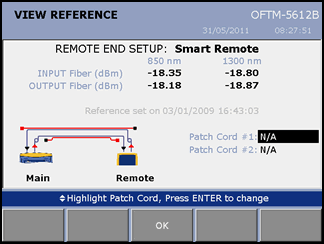
If you are using 62,5/125 µm with the DTX-MFM2, you should expect a value better than -20,00 dBm.
If you are using 50/125 µm with the DTX-MFM2, you should expect a value better than -24,50 dBm.
If you are using the DTX-GFM2 or DTX-SFM2, you should expect to see a value better than -8,00 dBm.
Nota: -24,00 dBm is better than -24,50 dBm
Values within these ranges do not guarantee your test reference cords are clean. You must continually inspect and clean your test reference cords to avoid negative loss readings.
- You can enter the length of your test cords here for documentation purposes. Otherwise, press the F3 key OK.
- Remove the SC plug from the INPUT port on the OptiFiber:
- Remove the SC plug from the INPUT port on the DTX Smart Remote:
- Connect the SC plug from Duplex 1 to the INPUT port of the OptiFiber:
- Connect the SC plug from Duplex 2 to the INPUT port on the DTX Smart Remote:
- You are now ready to connect to your link to test.
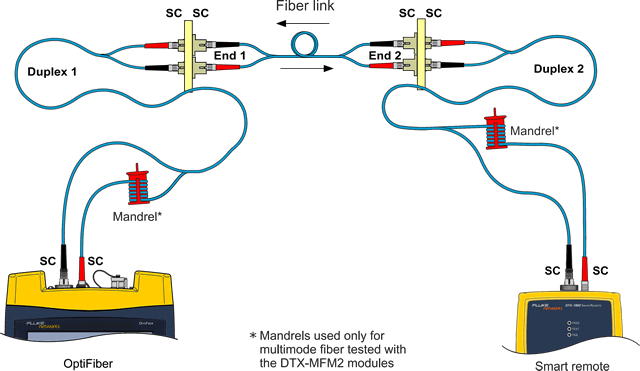
- Connect the DTX Smart Remote with Duplex 2 to End 2 of your fiber link:

- Connect the OptiFiber with Duplex 1 to End 1 of your fiber link:
- Press the FUNCTIONS key.
- Highlight Loss/Length and press the ENTER key.


