Caso real 1: pasa NEXT marginalmente en un DTX CableAnalyzer
(This marginal pass was caused by a poor termination. If you think that is the case with your installation, you can also click here to see a video of Adrian Young from our Technical Assistance Center walk you through the process of diagnosis using the HDTDX tool.)
In this case study, the installer was not achieving the level of performance expected when certifying his category 6 permanent links. Using these connectors and cable on a previous installation yielded margins of 5,0 dB and not margins as low as 0,5 dB seen here. With the DTX CableAnalyzer, it is possible to discover why these links were marginal in performance.
When a result is marginal, it is marked with an asterisk. A result marked with an asterisk means that measurements are in the testers accuracy uncertainty rangeand the * notation is required by the cabling standards ANSI/TIA-1152 and IEC 61935-1 (you are not permitted by the standard to disable marginal reporting).
After the AUTOTEST, the installer was presented with the following DTX CableAnalyzer test result.
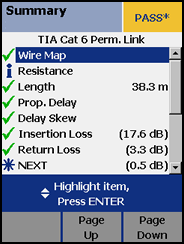
It is important to note that this link is considered a PASS as far as the cabling standards are concerned. However, some cabling specifiers will not accept a marginal pass. The most common cause in rejecting a marginal pass is that the end user has been sold "a premium cabling system". If the cabling system is "premium", you would quite rightly expect to see no marginal passes.
Your DTX CableAnalyzer can help you diagnose the marginal NEXT result. Let's review the process. Do not skip Step 1 please.
Paso 1
Find out which pair combination of NEXT is causing the marginal pass.
- Highlight NEXT.
- Press the ENTER key.
- Press the F3 to display the worst pair.
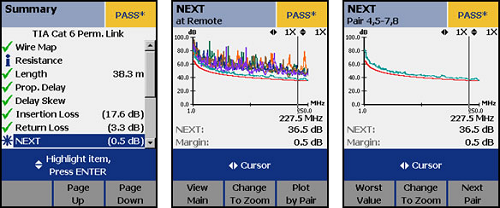
Here we see that Pair 4,5-7,8 is the cause of the marginal NEXT result. Make a note of this failing pair.
Paso 2
Look at the HDTDX Analyzer trace for this marginal pair.
- Press the EXIT key twice to return to the main screen.
- Highlight HDTDX Analyzer.
- Press the ENTER key.
- Press the F3 until you get to the marginal pair, in this case: Pair 4,5-7,8
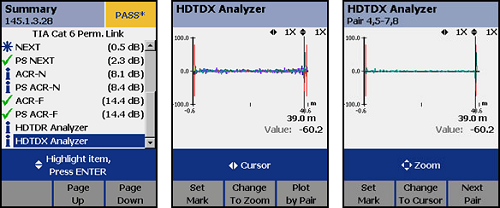
Paso 3
Analyze the trace. What you are seeing is where the crosstalk is happening in the link. The cursor automatically goes to the largest source of crosstalk. In this case, the largest source of crosstalk occurred at 39,0 m. The two red lines represent the ends of the test leads of the DTX CableAnalyzer. So you can assume the red lines are the location of your first and last connection. Since the cursor at 39,0 m is on top of the second red line, it suggests an issue with the far end connector. You can zoom in on this event to get a better picture:
- Press the F2 key.
- Press the right cursor key.
- Press the up cursor key.
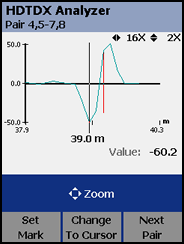
This is what you would expect to see a mated connection to look like on the HDTDX Analyzer, but hopefully not as large as this. You will note there is a "Value: -60,2" on the screen as well. This is the value of the peek at the place of the cursor. In an ideal world, the value should not exceed 17,5 for any given selected test standard/limit. Clearly that has been exceeded. Looks like the far end connection needs to be reterminated.
Out of curiosity, let's look at the near end for the same Pair 4,5-7,8 on this link:
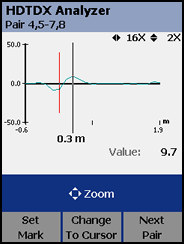
Much better than the remote termination. And the "Value: 9,7" is below our ideal goal of 17,5.
The cable looks good. You can determine this by the amount of crosstalk between the two connectors. It's very small.
If you have "Store Plot Data" enabled in your DTX CableAnalyzer, these graphs will be available to analyze in LinkWare PC Software.
Conclusión:
Cable looks good. Far end connector needs reterminating. This conclusion assumes you are using the correct category of connector and that the connector is truly component compliant. How can you tell? If the connectors at each end of the link are the same type, you should see a similar response. If all of your links are marginal and you see an HDTDX response such as this - it may suggest the need to try a different brand of connector.


