Statement of Volatility for the DTX CableAnalyzer
Clearing Test Results and Setup Information from a DTX Cable Analyzer
Fluke Networks has received several inquiries about the best method of removing all test results and setup information from a DTX. This is usually in the context of a consultant that moves from one customer network to another, or it is related to moving an DTX back and forth between Government unclassified and classified networks.
In either case it is important that information about an area is wiped entirely from the DTX before the instrument leaves the area.
The procedure described in this statement requires DTX firmware version 1,3 or later be installed on the DTX main unit.
Do not use the SPECIAL FUNCTIONS menu View / Delete Results selection to delete results in the tester. When results are removed using this method, they are temporally stored in a recoverable part of the flash memory on the main circuit board and can be restored. Use the factory clean method described in “Clearing the DTX Main Board Flash Memory” in this document, and the format method described in “Clearing the Removable SD/MMC Cards” in this document to make sure the results are removed from the tester.
DTX system architecture
A complete DTX Cable Analyzer comes in a set of two testers. The first tester, called the main unit, includes a keypad controlled graphic user interface, an optional SD/MMC interface, USB interface, optional RS232 interface, and the test interface. The second tester, called the remote unit, contains status LEDs, a simplified keypad including a TEST key and a TALK key, USB interface, optional RS232 interface, and a test interface. When the DTX runs a test, the main unit and remote unit are connected via the test interface. The main and remote units exchange information during the course of running a test. Any information gathered by the remote during the course of a test is transferred from the remote unit to the main unit for storage. Non-volatile information is not stored on the remote unit following the completion of a test.
Both the main and remote DTX Cable Analyzer units run the VxWorks operating system. They are battery powered, and store their firmware, factory calibration data and serial numbers in flash memory located on the main circuit board.
The USB and optional RS232 interface on the remote unit are only used to update the firmware in the remote unit. The firmware can be updated by Fluke Networks LinkWare, an application that runs on a separate PC.
The USB and optional RS232 interface on the main unit can be used to update the firmware in the main unit. In addition, the main unit USB and RS232 interface can be used by Fluke Networks LinkWare to extract results and setup information from the DTX main unit. LinkWare can also download setup information through the USB and RS232 interface to the DTX main unit.
The DTX main unit stores test results in a reserved portion of the flash memory located on the main board. Test results can also be stored on removable SD or MMC cards. The DTX main unit stores user setup information in a reserved portion of the flash memory on the main circuit board of the DTX main unit.
Because the DTX remote unit does not store any user test or setup data, no action is needed to clean a DTX remote unit. To clean a DTX main unit, clean all of the user setup information and results stored on the flash memory of the main circuit board of the DTX. The user must also clean all of the SD cards or MMC cards on which results were stored by the DTX.
Clearing the DTX Main Board Flash Memory
To clean the DTX Main Board, first turn off the DTX. When the DTX is completely powered down, simultaneously hold down the F1, F3, and SAVE keys. While continuing to hold these keys down, power up the DTX. You must continue to hold the F1, F3, and SAVE keys down simultaneously until the DTX powers up to the main user interface. The diagram below shows the position of these keys on the DTX keypad:

Once the DTX has powered up, turn the rotary knob to the SPECIAL FUNCTIONS position, and select Self Test using the arrow keys on the DTX keypad. You should see the following on the DTX display:
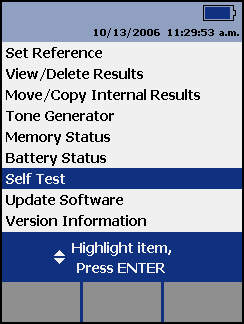
Next, press the ENTER key to activate the Self Test screen. You should see the following on the DTX display:
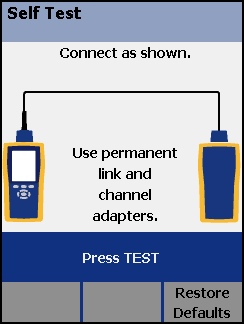
Notice the F3 softkey label, Restore Defaults. This appears as a result of the special power up sequence. Press the F3 softkey to completely clean the DTX. This will factory clean the DTX, which restores the user setup information to the factory defaults, clears any results stored in the flash memory on the main circuit board, and clears any results on any SD/MMC card that is plugged into the DTX main unit.
Clearing the Removable SD/MMC Cards
Because of the nature of SD/MMC cards, Fluke Networks cannot guarantee that data can be completely removed from an SD/MMC card. Third party utilities are available that may be able to recover the erased information. There are two methods to clear the removable SD/MMC cards. Both involve formatting the SD/MMC cards that were used with the DTX.
Método 1
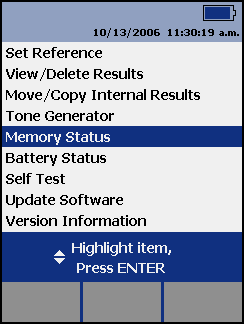
To format an SD/MMC card using the DTX, first insert the card into the DTX. Turn the rotary knob to the SPECIAL FUNCTIONS position, and select Memory Status using the arrow keys. You should see the following on the DTX:
Next, press the ENTER key to activate the Memory Status screen. If the memory status screen is not displaying the status of the Memory Card, press the F1 key to select the Memory Card. You should see the following on the DTX display:
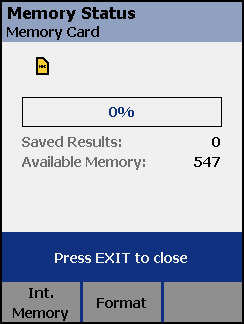
Press the F2 key to request a Memory Card format. The DTX will display a screen asking you to acknowledge this operation. Reply in the affirmative by pressing the F3 softkey.
Método 2:
Each SD/MMC card used with the DTX can be cleaned by using formatting utilities with an SD/MMC card reader on a PC. The formatting utility should erase the entire content of the SD/MMC card.


